Grafana + Prometheus
https://developer.aliyun.com/article/987854
https://juejin.cn/post/6948241754030080037
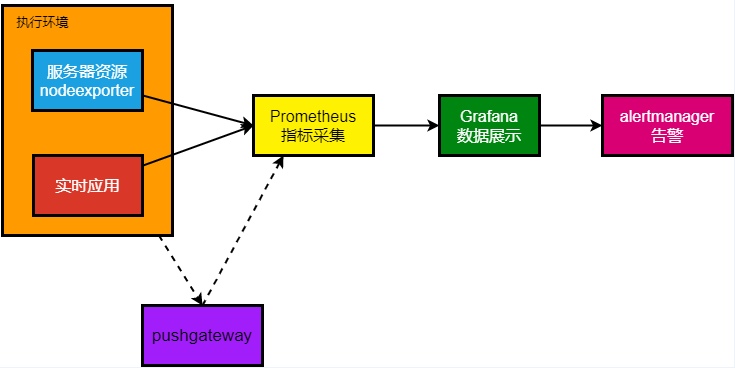
基本思路是: node_exporter 收集服务器数据,prometheus 从 node_exporter 收集数据,grafana 展示数据。

安装 Grafana
https://grafana.com/grafana/download
建议直接 Docker 拉下来
docker run -d --name=grafana -p 3000:3000 grafana/grafana-enterpriseGrafana 会在 3000 端口启动,访问 http://ip:3000/ 即可看到 Grafana 的登录界面。
默认用户名和密码是 admin/admin
安装 Node Exporter
https://prometheus.io/download/
https://github.com/prometheus/node_exporter
下载解压,直接运行
./node_exporterNode Exporter 会在 9100 端口启动,访问 http://ip:9100/metrics 即可看到 Node Exporter 的数据。
安装 Prometheus
https://prometheus.io/download/
下载解压之后需要编辑一下配置文件 prometheus.yml
# my global config
global:
  scrape_interval: 15s # Set the scrape interval to every 15 seconds. Default is every 1 minute.
  evaluation_interval: 15s # Evaluate rules every 15 seconds. The default is every 1 minute.
  # scrape_timeout is set to the global default (10s).

# Alertmanager configuration
alerting:
  alertmanagers:
    - static_configs:
        - targets:
          # - alertmanager:9093

# Load rules once and periodically evaluate them according to the global 'evaluation_interval'.
rule_files:
  # - "first_rules.yml"
  # - "second_rules.yml"

# A scrape configuration containing exactly one endpoint to scrape:
# Here it's Prometheus itself.
scrape_configs:
  # The job name is added as a label `job=<job_name>` to any timeseries scraped from this config.
  - job_name: "prometheus"
    static_configs:
      - targets: ["localhost:9090"]

  - job_name: 'server'
    static_configs:
      - targets: ['localhost:9100']
默认的一般都不用动,主要是两个 job,一个是 prometheus 自己,一个是 server,server 是 node_exporter 的地址。
访问 http://ip:9090/ 即可看到 Prometheus 的界面。
其实 Prometheus 也可以作为监控面板,但是 Grafana 更强大,所以一般都是用 Grafana。
Grafana 配置 Prometheus 数据源
登录 Grafana,默认管理员是 admin/admin,登陆进去之后记得改密码。
点击左侧的 Configuration -> Data Sources -> Add data source ,选择 Prometheus。
填写 Prometheus 的地址,一般是 http://ip:9090/ ,点击 Save & Test,如果显示 Data source is working 就说明配置成功了。
Grafana 导入 Dashboard
Grafana 有很多 Dashboard 可以直接导入,点击左侧的 + -> Import ,输入 Dashboard 的 ID,点击 Load,然后选择 Prometheus 数据源,点击 Import 即可。
https://grafana.com/grafana/dashboards/
推荐款:
https://grafana.com/grafana/dashboards/1860-node-exporter-full/
然后即可看到 Dashboard 的数据。
配置 systemd 实现开机自启
注意权限,不然拉不起来
记得改为自己配置的用户名和路径
在 /etc/systemd/system/node_exporter.service
sudo vim /etc/systemd/system/node_exporter.service[Unit]
Description=Node Exporter
After=network.target
[Service]
User=cherrling
ExecStart=/opt/grafana/node_exporter/node_exporter
Restart=on-failure
[Install]
WantedBy=multi-user.target在 /etc/systemd/system/prometheus.service
sudo vim /etc/systemd/system/prometheus.service[Unit]
Description=Prometheus
Wants=network-online.target
After=network-online.target
[Service]
User=cherrling
WorkingDirectory=/opt/grafana/prometheus
# ExecStart=/opt/grafana/prometheus/prometheus --config.file=/opt/grafana/prometheus/prometheus.yml --storage.tsdb.path=/opt/grafana/prometheus/data
ExecStart=/opt/grafana/prometheus/prometheus
Restart=on-failure
[Install]
WantedBy=multi-user.target重载 systemd
sudo systemctl daemon-reload启动服务
sudo systemctl start node_exporter
sudo systemctl start prometheus
开机自启
sudo systemctl enable node_exporter
sudo systemctl enable prometheus
检查服务状态
sudo systemctl status node_exporter
sudo systemctl status prometheus